

The art of linocut printing is a dance between precision and spontaneity, where a single tool can carve out entire worlds from a humble slab of linoleum. Among its many techniques, the jigsaw linocut stands apart—a method that transforms a seemingly chaotic array of separate pieces into a harmonious, unified print. It’s a process that rewards patience and creativity, where the artist becomes both architect and storyteller, piecing together fragments to reveal a final image that feels both inevitable and surprising. Whether you’re a seasoned printmaker or a curious beginner, the jigsaw linocut offers a tactile, immersive experience that bridges the gap between planning and serendipity. This guide explores the myriad ways you can approach this captivating technique, from conceptualizing your design to mastering the final print, ensuring every step is as rewarding as the finished piece.
The Allure of the Jigsaw Linocut: Why It Captivates Artists
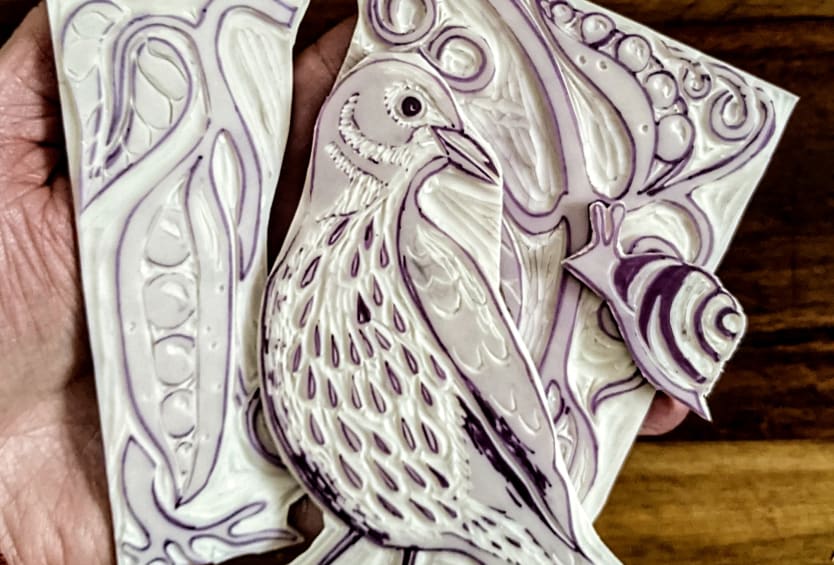
The jigsaw linocut is more than a printing method; it’s a philosophy of creation. Unlike traditional linocut, where the entire design is carved from a single block, the jigsaw technique involves dissecting the image into multiple sections, each carved independently before being reassembled for printing. This approach unlocks a realm of possibilities: the ability to layer colors with surgical precision, to experiment with textures that defy the limitations of a single block, and to embrace the organic imperfections that arise from hand-carved edges. For artists who thrive on the interplay between control and chance, the jigsaw linocut is a playground where every cut tells a story.
The tactile nature of the process is part of its magic. There’s something deeply satisfying about the way the gouge digs into the linoleum, the way the shavings curl away like whispers of the design taking shape. When you separate the pieces, you’re not just dividing an image—you’re unraveling a puzzle, each fragment holding a clue to the final composition. The reassembly phase is where the true alchemy happens, as the individual blocks come together to form a cohesive whole. It’s a reminder that art, like life, is often about finding beauty in the spaces between the parts.

The jigsaw linocut also invites collaboration, even if it’s just between the artist and their own hands. Because each block can be carved and inked separately, it’s possible to involve multiple people in the process—each contributing to a single print. This communal aspect adds another layer of depth, as the final image becomes a tapestry of individual expressions. Whether you’re working alone or with others, the technique fosters a sense of connection to the material and the process, making each print a testament to the journey as much as the destination.
Designing for the Jigsaw: From Concept to Carved Reality
Before a single gouge is made, the design must be meticulously planned. The jigsaw linocut demands a shift in perspective: instead of visualizing a single, continuous image, you must think in terms of interlocking fragments. Start by sketching your composition on paper, considering how each section will fit together like a jigsaw puzzle. Pay attention to the edges—these will become the seams where the blocks meet, and they can either enhance or disrupt the flow of the design. Sharp, angular cuts create dynamic tension, while softer, curved edges lend a sense of fluidity. The key is to strike a balance between intentionality and spontaneity, allowing the design to evolve as you carve.
Color plays a pivotal role in the jigsaw linocut, where each block can be inked independently. Think of your design in layers, like a geological formation, where each stratum adds depth and complexity. You might choose to use a single color for the entire print, focusing on texture and contrast, or you could opt for a multi-color approach, where each block is inked in a different hue. The latter requires careful registration to ensure the colors align perfectly, but the results can be breathtaking—a symphony of hues that dance across the page. Consider the psychological impact of your color choices, too. Warm tones evoke energy and passion, while cool tones soothe and introspect. The interplay of color and form in a jigsaw linocut can evoke emotions as powerfully as any painting.

Another approach is to embrace the organic nature of the process by allowing the design to emerge intuitively. Start with a rough sketch, then carve the blocks without over-planning. The gaps between the pieces can become part of the composition, creating negative space that breathes life into the print. This method is ideal for abstract or experimental work, where the final image is as much a surprise to the artist as it is to the viewer. The jigsaw linocut thrives on this balance between structure and serendipity, making it a technique that rewards both meticulous planners and free-spirited creators.
Tools of the Trade: Essential Equipment for Jigsaw Linocut
The right tools can elevate your jigsaw linocut from a simple exercise to a transcendent experience. At the heart of the process is the linoleum itself—a smooth, resilient surface that’s forgiving yet demanding. Choose a high-quality battleship linoleum or battleship gray linoleum for its durability and ease of carving. The thickness should be at least 3mm to withstand multiple passes with the gouge without warping. For the carving, a set of sharp linocut tools is indispensable. Look for a variety of gouges, from V-shaped to U-shaped, to create different line weights and textures. A sharp tool not only makes the carving process smoother but also reduces the risk of tearing the linoleum.
Inking the blocks requires precision, and a good brayer is your best ally. Choose a brayer with a medium-hardness roller to ensure even ink distribution without leaving streaks. For multi-color prints, you’ll need separate brayers for each color to avoid contamination. A palette knife is useful for mixing inks and applying them to the brayer, while a glass slab or smooth, non-porous surface serves as an ideal inking plate. When it comes to printing, a sturdy barren or a wooden spoon can be used to apply pressure, but a printing press is the gold standard for achieving consistent, high-quality results. If a press isn’t available, a hand-cranked etching press can work in a pinch, though it requires more manual effort.
Don’t overlook the importance of registration tools, especially for multi-block prints. A registration jig or a simple registration sheet can help align the blocks perfectly, ensuring that each color and shape falls into place. For larger prints, consider using registration pins or a pin-and-hole system to maintain consistency across multiple impressions. The right tools not only make the process more efficient but also allow you to focus on the creative aspects of the jigsaw linocut, where the real magic happens.
Carving Techniques: Mastering the Art of the Gouge
The act of carving is where the jigsaw linocut truly comes alive. It’s a meditative process, where each cut is a deliberate stroke of intention. Start by transferring your design onto the linoleum using a transfer paper or a lightbox. Use a pencil to sketch the outlines lightly, as these lines will guide your gouges. When carving, always cut away from your body to avoid injury, and work in a well-ventilated space to minimize inhalation of linoleum dust. The key to clean cuts is to let the tool do the work—apply steady, even pressure rather than forcing the gouge through the material.
For the jigsaw technique, consider the following carving approaches: the “island” method, where you carve out the negative space around the design, leaving the image as raised islands; the “puzzle” method, where the design is divided into interlocking pieces that fit together like a jigsaw; and the “layered” method, where each block represents a different layer of the composition, such as foreground, midground, and background. The island method is ideal for bold, graphic designs, while the puzzle method lends itself to intricate, detailed work. The layered method is perfect for creating depth and complexity, especially in multi-color prints.
Experiment with different gouge sizes and shapes to create varied textures. A fine V-gouge can produce delicate lines, while a broad U-gouge is perfect for hatching and shading. Don’t be afraid to embrace imperfections—the uneven edges and slight variations in depth add character to the print. The jigsaw linocut is as much about the process as the product, so allow yourself to make mistakes and learn from them. Each gouge is a conversation between you and the material, a dialogue that evolves with every cut.
Inking and Printing: Bringing the Design to Life
Inking is where the jigsaw linocut transitions from a collection of carved fragments to a cohesive image. The process begins with selecting your inks—water-based inks are beginner-friendly and easy to clean, while oil-based inks offer richer colors and longer working times. For multi-color prints, start with the lightest color and work your way to the darkest, allowing each layer to dry before adding the next. This prevents smudging and ensures crisp, clean edges. Use a brayer to roll out a thin, even layer of ink on your inking plate, then transfer it to the linocut block with smooth, overlapping strokes. Avoid over-inking, as this can fill in the carved lines and lose detail.
When printing, place your inked block face-up on your printing surface, then carefully position your paper. For multi-block prints, use registration tools to align the blocks precisely. If you’re printing by hand, place a sheet of newsprint or scrap paper over the block and press firmly with a barren or wooden spoon, applying even pressure across the entire surface. For larger prints, a printing press can save time and effort, ensuring consistent pressure and registration. Peel back the paper slowly to reveal the print—this moment of anticipation is where the magic of linocut truly shines.
Don’t be disheartened if your first few prints aren’t perfect. Linocut is a process of trial and error, where each impression teaches you something new. Experiment with different papers—textured, smooth, or even handmade—to see how they interact with the ink. The absorbency of the paper can dramatically alter the final appearance of the print, from bold and graphic to soft and ethereal. Keep a print journal to document your experiments, noting the techniques, inks, and papers you’ve used. Over time, you’ll develop a deeper understanding of the medium and a more intuitive sense of what works.
Finishing Touches: Editioning, Signing, and Presentation
The final step in the jigsaw linocut process is often the most overlooked: the presentation. How you finish and present your prints can elevate them from mere artworks to cherished pieces. Start by editioning your prints—number each one sequentially (e.g., 1/10, 2/10) and sign them in pencil on the lower margin. This not only adds value but also creates a sense of exclusivity. If you’re working with a limited edition, consider adding a title and date to each print, as this provides context and connects the artwork to a specific moment in time.
Mounting and framing are where you can let your creativity shine. A simple mat and frame can enhance the print’s presence, while a floating frame can create a modern, gallery-like effect. For a more organic look, consider mounting the print on a wooden panel or embedding it in a handmade book. The key is to complement the print without overshadowing it. Think about the environment where the print will be displayed—will it hang in a bright, sunlit room or a cozy, dimly lit space? The lighting and surroundings can dramatically affect how the colors and textures are perceived.
Don’t forget to document your prints for your portfolio or website. High-quality photographs can capture the nuances of the linocut, from the depth of the carving to the richness of the ink. Use natural light and a neutral background to ensure the colors are accurate. If you’re selling your prints, consider offering them as part of a series or a themed collection. The jigsaw linocut lends itself beautifully to storytelling, so curate your editions with intention, creating a narrative that draws the viewer in.
The jigsaw linocut is a testament to the beauty of fragmentation and unity, where separate pieces come together to form something greater than the sum of their parts. It’s a process that challenges the artist to think differently, to embrace the unexpected, and to find joy in the tactile dance of carving, inking, and printing. Whether you’re drawn to its meditative qualities, its collaborative potential, or the sheer thrill of seeing a design emerge from chaos, the jigsaw linocut offers a world of creative possibilities. So gather your tools, sharpen your gouges, and let the adventure begin. The perfect print is waiting to be pieced together—one block at a time.


Leave a Comment