

Imagine a world where every droplet you sketch doesn’t just sit on the page—it *breathes*. Where the light dances across its curved surface, where the air around it hums with tension, and where the viewer can almost feel the coolness of the water. Drawing water droplets that look wet isn’t just about capturing shape; it’s about conjuring an illusion so vivid that the mind forgets the paper beneath. It’s a trick of perception, a sleight of hand with graphite and light. And once you master it, your drawings won’t just show water—they’ll *evoke* it.
Most artists start by sketching a simple oval. But that’s where the magic dies. A wet droplet isn’t a static blob—it’s a living, breathing entity, shaped by gravity, surface tension, and the invisible dance of air molecules. It clings, it bulges, it refracts. To draw it convincingly, you must first see it not as an object, but as a *moment*—a frozen instant in a fluid, ever-changing world. This guide will take you beyond the basics, revealing the secrets of texture, light, and perspective that transform a simple circle into a dewdrop that could fool the eye.
The Anatomy of a Wet Droplet: More Than Meets the Eye
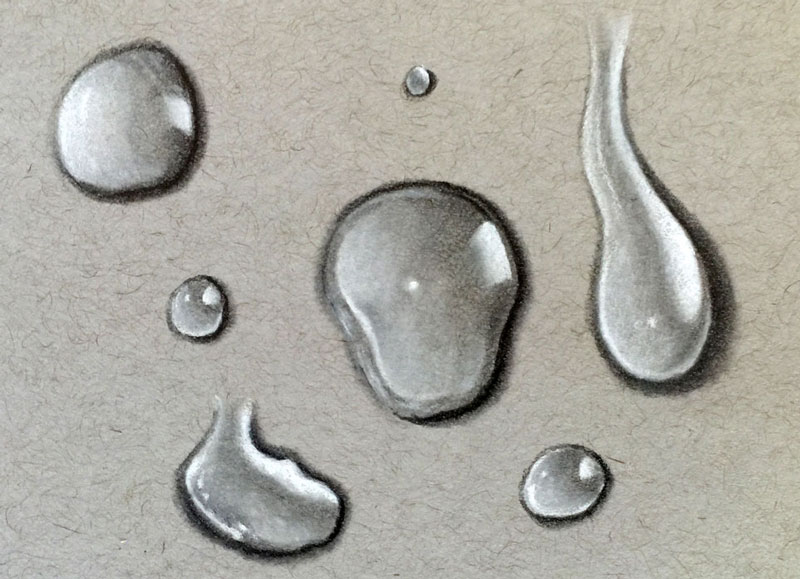
A droplet isn’t just a sphere—it’s a dynamic system. When water rests on a surface, it forms a meniscus, a curved boundary where the liquid meets the air. This isn’t a smooth curve; it’s a subtle bulge, thicker at the base where gravity pulls it downward, tapering as it rises. The top isn’t flat—it’s a gentle dome, often with a tiny, almost imperceptible dimple at the apex where the surface tension is strongest.
But here’s the secret: the way light interacts with this shape is what sells the illusion. A wet droplet isn’t just reflective—it’s *translucent*. Light doesn’t just bounce off its surface; it bends through it, creating a soft, glowing core. The edges aren’t sharp—they blur into the background, dissolving into the air. To draw this, you must think in layers: the outer highlight, the mid-tone shadow, and the inner glow. Each layer tells a story about the droplet’s environment—whether it’s resting on glass, leaf, or skin.
Start by observing real droplets. Place a glass of water near a window. Watch how the light fractures through the curve, how the shadows deepen where the droplet meets the surface. Notice the tiny distortions in the background—these aren’t flaws; they’re clues. They tell you where the droplet is bending space, where it’s acting like a tiny lens. Your pencil must mimic this. Don’t just draw the droplet—draw the *effect* it has on everything around it.
The Illusion of Wetness: Texture That Tricks the Brain
Wetness isn’t just about shine—it’s about *absence*. A dry surface has texture. A wet one has a deceptive smoothness that makes the eye believe in the impossible. To capture this, you must erase the texture, not add it. Use a kneaded eraser to lift graphite from the paper, creating soft gradients where the droplet meets the surface. The transition should be seamless, as if the water has dissolved the roughness of the world around it.
But here’s the twist: wetness also creates *new* textures. Where the droplet clings, the surface beneath it may appear compressed, slightly warped. Think of a leaf bending under the weight of a dewdrop—its veins seem to curve inward, as if pulled by an invisible thread. To draw this, use subtle hatching or cross-contour lines that follow the curvature of the surface, reinforcing the idea that the droplet is altering reality just by existing.
And then there’s the matter of the droplet’s own surface. A wet droplet isn’t perfectly smooth—it’s covered in microscopic ripples, tiny imperfections that catch the light. These aren’t details you’ll draw explicitly; they’re implied through soft, irregular highlights. Instead of a single, sharp reflection, imagine a constellation of tiny, scattered glints. They flicker like stars in a distant galaxy, hinting at the droplet’s vitality.

Light as a Sculptor: Bending Reality with Value
Light doesn’t just illuminate—it *molds*. The way it caresses a droplet’s surface reveals its form, while the shadows it casts define its weight. A droplet in direct sunlight will have a bright, almost blinding highlight, while one in diffused light will glow softly, like a pearl. The key is to study the light source’s angle. Is it coming from above? The highlight will be near the top. From the side? The reflection will stretch horizontally.
But light does something even more magical: it creates *caustics*—those intricate, swirling patterns of light that dance on surfaces beneath the droplet. These aren’t random; they’re geometric distortions, where the curved surface of the droplet acts like a prism. To draw them, use fine, wispy lines that follow the droplet’s curvature. They should be lighter than the surrounding shadows, as if the light itself is spilling over the edges.
And don’t forget the *core* of the droplet—the area where light enters and refracts. This isn’t a solid color; it’s a gradient, shifting from warm to cool as it deepens. Use a soft, blended transition, with the brightest point near the highlight and the darkest at the base. This inner glow is what makes the droplet feel alive, as if it’s holding a secret source of light within.
Perspective and Context: Placing Droplets in a Believable World
A droplet doesn’t exist in a vacuum. It’s part of a larger ecosystem—whether it’s clinging to a spiderweb, rolling down a windowpane, or resting on the petal of a flower. The surface it sits on tells a story. A glass surface will have sharp, clean reflections. A leaf will have organic, vein-like distortions. A fabric will show subtle wrinkles that the droplet molds to.
To draw this, start with the surface first. Sketch its texture—rough or smooth, organic or geometric. Then, place the droplet. Its shape will conform to the surface, bulging where the material gives way, flattening where it resists. The droplet’s shadow should follow the contours of the surface, stretching or compressing to match. If the surface is uneven, the droplet’s base may appear slightly tilted, as if it’s struggling to maintain its balance.
And don’t underestimate the power of the background. A droplet on a plain white surface will look flat. But place it against a textured wall, a patterned fabric, or a blurred landscape, and suddenly it gains depth. The background shouldn’t compete with the droplet—it should *frame* it, providing context that makes the illusion stronger. Think of the droplet as a character in a story. Where does it live? What does it reflect? The answers will guide your hand.

The Final Touch: Refining the Illusion
Once the basic structure is in place, it’s time to refine. Use a sharp, fine-point pencil to add the smallest highlights—the tiny glints that catch the light. These aren’t just dots; they’re *sparks*, the first sign of life in your droplet. Then, soften the edges with a blending stump or tortillon, ensuring the transitions between light and shadow are seamless. The goal isn’t perfection—it’s *conviction*. The viewer should feel the droplet’s presence, even if they can’t explain why.
And finally, step back. Squint at your drawing. Does the droplet feel wet? If not, ask yourself: where is the light coming from? Where are the distortions? Where is the glow? Adjust one element at a time, always keeping the big picture in mind. Remember, a droplet isn’t just a shape—it’s a *moment*. It’s the instant before the water slips away, the breath before the drop falls. Capture that, and your drawing won’t just show water—it will make the viewer *feel* it.
There’s a quiet magic in drawing water droplets that look wet. It’s the art of making the invisible visible, of turning a fleeting glance into a lasting impression. When you master this, you don’t just draw droplets—you draw the very essence of wetness. And once you’ve done that, the world will never look the same again.


Leave a Comment