

Projection mapping on a moving set piece is a mesmerizing way to transform static scenery into a dynamic canvas, but it demands precision, foresight, and a deep understanding of both the art and the technology involved. The challenge isn’t just about making the projection visually stunning—it’s about ensuring the show runs smoothly without crashing QLab, the industry-standard software for media playback in live performance. Whether you’re a seasoned designer or a curious newcomer, navigating the complexities of synchronizing motion with media requires a blend of technical prowess and creative problem-solving. This guide will walk you through the essential steps, from pre-visualization to real-time troubleshooting, to help you master the art of projection mapping on moving set pieces.
Before diving into the technical intricacies, it’s crucial to recognize the types of content you can expect to encounter in this journey. You’ll explore the fundamentals of projection mapping, the role of motion tracking, the importance of cue synchronization, and the strategies for optimizing QLab’s performance. Additionally, you’ll uncover advanced techniques for handling unexpected variables, such as latency, hardware limitations, and environmental factors. By the end, you’ll not only understand how to avoid crashes but also how to elevate your projections into seamless, immersive experiences that captivate audiences.
The Foundations of Projection Mapping on Moving Set Pieces
Projection mapping, or spatial augmented reality, involves warping and blending visuals to fit the contours of a physical object—in this case, a moving set piece. The key to success lies in understanding the interplay between the set’s motion and the projected media. Unlike static surfaces, moving set pieces introduce variables such as speed, trajectory, and acceleration, all of which must be accounted for in your design. The first step is to create a detailed 3D model of your set piece, which will serve as the blueprint for your projections. This model should include precise measurements, surface textures, and the range of motion the piece will undergo during the performance.
Once you have your 3D model, the next phase is to simulate the projection mapping in a virtual environment. Software like TouchDesigner or Resolume can help you visualize how your media will interact with the moving set piece. This pre-visualization stage is critical because it allows you to identify potential issues before they become problems on stage. For instance, you might discover that certain angles of projection cause distortion or that the speed of the set piece outpaces the refresh rate of your media server. By addressing these issues early, you save valuable time and resources during the actual setup.
Another foundational element is the choice of projection hardware. Not all projectors are created equal, and selecting the right one can make or break your projection mapping project. Look for projectors with high brightness (measured in lumens) to ensure visibility in various lighting conditions, and consider the throw ratio—the distance between the projector and the set piece relative to the size of the projected image. Short-throw projectors are ideal for tight spaces, while long-throw projectors work better for larger distances. Additionally, ensure your projectors have a high refresh rate to minimize flicker and motion blur, especially when dealing with fast-moving set pieces.
Synchronizing Motion and Media: The Heart of the Challenge
The crux of projection mapping on a moving set piece is synchronization. Every movement of the set piece must align perfectly with the projected media to create a cohesive illusion. This is where QLab’s strengths shine, but it also highlights its limitations. QLab excels at triggering cues with precision, but it relies on external inputs to adapt to real-time changes. To achieve seamless synchronization, you’ll need to integrate motion tracking systems, such as optical tracking or inertial measurement units (IMUs), which provide real-time data on the set piece’s position, speed, and orientation.
One effective method is to use OSC (Open Sound Control) to send motion data from your tracking system directly to QLab. This allows QLab to adjust its cues dynamically based on the set piece’s movements. For example, if the set piece accelerates, QLab can trigger a corresponding change in the projected visuals to maintain the illusion of continuity. However, this requires careful calibration to ensure the motion data is accurately translated into QLab’s timeline. Latency is a common pitfall here—even a slight delay between the set piece’s movement and the projected response can disrupt the illusion. To mitigate this, minimize the number of processing steps between the motion sensor and QLab, and use high-speed networks to transmit data.
Another synchronization technique is to use timecode, either embedded in your media files or generated by an external device. Timecode provides a consistent reference point that both the motion tracking system and QLab can follow, ensuring that all elements stay in sync. SMPTE timecode is widely used in live performance, but MIDI timecode can also be effective for simpler setups. The key is to test your synchronization thoroughly during rehearsals, as even minor discrepancies can become glaring issues under stage lights.
It’s also worth considering the role of automation software, such as Isadora or Millumin, which can bridge the gap between motion tracking and media playback. These tools offer more granular control over how motion data interacts with your projections, allowing for complex interactions like reactive visuals or adaptive lighting. While QLab remains the backbone of many projection mapping setups, integrating additional software can provide the flexibility needed to handle the unpredictability of moving set pieces.
Optimizing QLab for High-Performance Projection Mapping
QLab is a powerful tool, but it’s not immune to performance bottlenecks, especially when handling high-resolution media on moving set pieces. To prevent crashes and ensure smooth playback, you’ll need to optimize QLab’s settings and your media assets. Start by organizing your workspace efficiently. Use separate cues for different elements of your projection—background visuals, dynamic effects, and interactive elements—and group them logically. This not only makes your workspace easier to navigate but also allows QLab to allocate resources more effectively.
Media optimization is another critical step. High-resolution videos and complex animations can strain QLab’s processing power, leading to dropped frames or crashes. To avoid this, compress your media files without sacrificing quality. Use codecs like H.264 or ProRes, which offer a good balance between file size and performance. Additionally, pre-render any effects or transitions in your media editing software before importing them into QLab. This reduces the computational load on QLab during playback, freeing up resources for other tasks.
Network configuration also plays a role in QLab’s performance. If you’re using multiple computers or devices to control different aspects of your projection mapping setup, ensure they’re all connected to a dedicated, high-speed network. Avoid Wi-Fi if possible, as it can introduce latency and instability. Instead, use wired Ethernet connections to minimize data transfer delays. If you’re working with multiple projectors, consider using a network-attached storage (NAS) device to centralize your media files, reducing the need for individual computers to access large files simultaneously.
Finally, don’t overlook the importance of backup systems. Even with meticulous planning, technical failures can occur. Create redundant copies of your QLab workspace and media files, and designate a secondary computer as a fail-safe. This ensures that if one system crashes, you can quickly switch to the backup without disrupting the performance. Regularly test your backup systems during rehearsals to confirm they’re functioning as expected.
Advanced Techniques for Handling Unpredictable Variables
No matter how well you plan, live performances are unpredictable. Environmental factors like temperature fluctuations, humidity, or even vibrations from stage machinery can affect your projection mapping setup. To handle these variables, build redundancy into your system. For example, use multiple projectors to cover the same area, so if one fails, the others can compensate. Alternatively, employ failover systems that automatically switch to a backup projector or media server if the primary system encounters an issue.
Another advanced technique is to use generative visuals—procedurally generated graphics that adapt in real-time to the set piece’s movements. Tools like TouchDesigner or Processing can create dynamic visuals based on motion data, reducing the reliance on pre-rendered media. This approach not only minimizes the risk of crashes but also adds a layer of spontaneity to your projections. For instance, you could design a system where the visuals respond to the speed of the set piece, creating a fluid, organic interaction that feels alive on stage.
Environmental lighting is another variable to consider. If your set piece moves through areas with varying light levels, your projections may appear washed out or too dim in certain spots. To combat this, use projectors with high dynamic range (HDR) capabilities, which can adjust brightness levels to maintain visibility. Alternatively, incorporate ambient lighting sensors into your setup to automatically adjust projector brightness based on the surrounding environment. This ensures your visuals remain vibrant and impactful, regardless of lighting conditions.
Finally, always have a plan for manual overrides. Even with the most advanced automation, there may be moments where human intervention is necessary. Design your QLab workspace with manual triggers for key cues, allowing you to step in and adjust the projection if something goes awry. This could be as simple as a footswitch or a MIDI controller that lets you advance or delay cues without disrupting the flow of the performance. The goal is to create a system that’s robust enough to handle most scenarios but flexible enough to adapt when the unexpected occurs.
Rehearsing and Refining Your Projection Mapping Setup
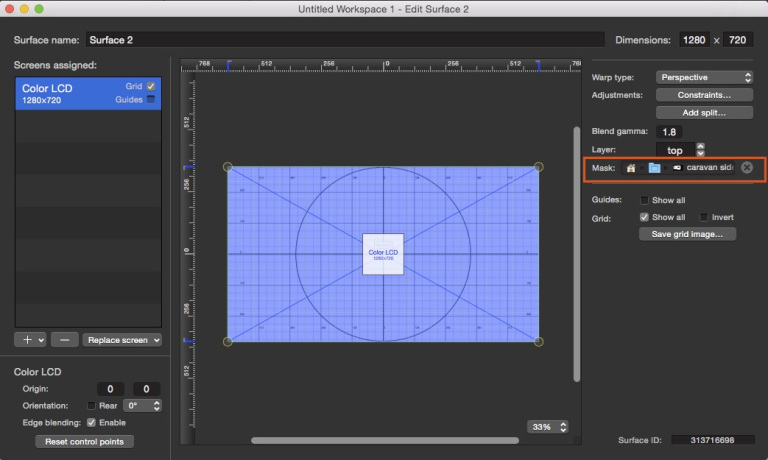
Rehearsals are where theory meets reality, and it’s the only way to truly test your projection mapping setup. Start with static rehearsals, where the set piece remains stationary, to fine-tune the alignment of your projections. Use this time to adjust masks, calibrate projectors, and ensure that your media files are playing back smoothly in QLab. Once you’re confident in the static setup, introduce motion gradually. Begin with slow, controlled movements to verify that the synchronization between the set piece and the projections holds up under real-world conditions.
During rehearsals, pay close attention to the audience’s perspective. Projection mapping can look flawless from the tech booth but may appear distorted or misaligned from the house. Walk through the venue to assess the visuals from different angles, and make adjustments as needed. This is also the time to test your backup systems and manual overrides, ensuring that every component of your setup is ready for the live performance.
Document every aspect of your rehearsals, from the settings of your projectors to the timing of your cues. This documentation will be invaluable during the actual performance, allowing you to quickly troubleshoot any issues that arise. It’s also a great way to identify patterns or recurring problems that you can address before the next rehearsal. Remember, the goal isn’t just to avoid crashes—it’s to create a seamless, immersive experience that leaves the audience in awe.
After each rehearsal, debrief with your team to discuss what worked and what didn’t. Encourage open communication, as every perspective can offer insights into improving the setup. Whether it’s a minor tweak to a projector’s position or a major overhaul of your synchronization strategy, continuous refinement is the key to success. By the time the performance arrives, your projection mapping setup should feel like a well-oiled machine, ready to deliver a flawless show.
Projection mapping on a moving set piece is as much an art as it is a technical challenge. It requires a deep understanding of both the creative and logistical aspects of live performance, from the nuances of 3D modeling to the intricacies of real-time synchronization. By mastering the foundations, optimizing your tools, and preparing for the unpredictable, you can transform even the most complex set pieces into mesmerizing visual spectacles. The result is a performance that doesn’t just tell a story—it immerses the audience in a world where motion and media become one, leaving them breathless and inspired.


Leave a Comment