

Imagine holding a lump of polymer clay in your hands—pliable, vibrant, and begging to be shaped into something extraordinary. Now, picture this same clay, once fired, gleaming with the opulence of veined Carrara marble, its swirling patterns whispering tales of ancient quarries and Renaissance masterpieces. It’s not a fantasy. It’s a reality unlocked by a simple, yet transformative trick that turns the ordinary into the extraordinary. If you’ve ever marveled at the idea of polymer clay mimicking the grandeur of marble, prepare to have your perspective shattered and rebuilt with newfound clarity. This isn’t just about crafting; it’s about transcending the limitations of your medium.
Marble, with its ethereal veining and luminous depth, has long been the darling of sculptors and artisans. But its fragility and cost make it inaccessible for many. Enter polymer clay—a versatile, user-friendly alternative that, when wielded with the right techniques, can produce results so convincing they’ll leave even seasoned artists doing a double-take. The secret? A blend of artistry, patience, and a dash of alchemy. This trick isn’t just a method; it’s a paradigm shift, one that will redefine what you believe is possible with polymer clay.
The Alchemy of Color: Crafting the Perfect Marble Palette
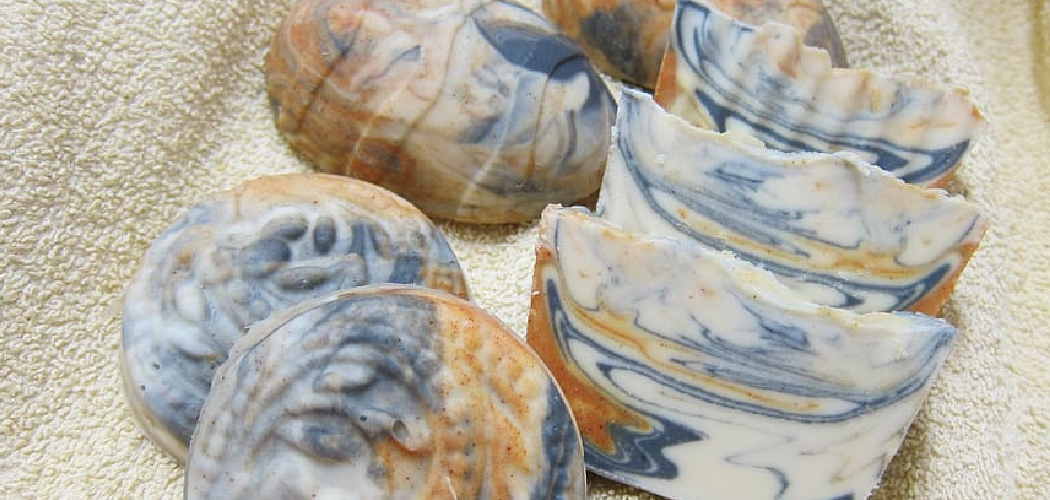
Before you even touch your clay, the foundation of your marble illusion is laid in color. Marble isn’t a single hue—it’s a symphony of tones, from the stark white of calcite to the inky depths of graphite veins. To replicate this, you’ll need a palette that breathes life into your creation. Start with a base color: a pristine white or soft ivory for classic marble, or a muted taupe for a more organic, aged look. The key is subtlety; avoid neon or overly saturated shades, as they’ll scream “fake” instead of whisper “masterpiece.”
Next, introduce your veining colors. Traditional marble veins often feature grays, blacks, or even soft blues and greens. For a more dramatic effect, consider blending in a touch of ochre or umber to mimic the earthy tones found in real marble. The magic lies in layering. Don’t just mix colors haphazardly—instead, create thin sheets of each hue and stack them like geological strata. This layered approach ensures your veins will have depth and variation, just like their natural counterparts.

Pro tip: Use a pasta machine to achieve uniform sheets. The thinner the layers, the more intricate your veins will appear once you begin the marbling process. And remember—less is more. A few well-placed veins can evoke the grandeur of a cathedral’s columns, while too many will muddy the effect and lose the marble’s signature elegance.
The Dance of Technique: Marbling Without the Mess
Now comes the moment where raw clay transforms into a mimic of nature’s most coveted stone. The marbling technique is where the real sorcery happens, and it’s deceptively simple. Start by conditioning your clay until it’s soft and pliable, then roll it into a sheet. Take your prepped veining colors and cut them into thin strips or irregular shapes. Place these “veins” onto your base sheet, spacing them apart to allow for organic flow.
Here’s where the trick diverges from traditional marbling. Instead of blending the colors with your fingers or tools, which can create a muddy, indistinct mess, try the “twist and fold” method. Gently twist your clay sheet along its length, then fold it in half. Repeat this process several times, each time rotating the sheet 90 degrees. This technique encourages the veins to stretch and meander, mimicking the unpredictable patterns found in natural marble. The result? A mesmerizing, vein-like network that looks like it was quarried, not crafted.
For added realism, incorporate a technique called “cane slicing.” Create a simple Skinner blend—a gradient of colors—and then slice thin sections from it. These slices can be layered onto your base clay, adding another dimension of veining. The beauty of this method is its precision; you can control the thickness and direction of each vein, ensuring a level of detail that’s nearly indistinguishable from the real thing.
Firing the Illusion: Achieving the Marble’s Luminous Finish
Polymer clay’s true test comes in the kiln—or, in this case, the toaster oven. Firing is where your marble illusion either shines or falls flat. The key? Temperature and timing. Most polymer clays have a recommended baking temperature, typically between 230°F and 300°F (110°C to 149°C). However, to achieve the translucent, glass-like quality of marble, you’ll need to push the boundaries slightly. Bake your piece at the higher end of the spectrum, but keep a close eye on it to prevent scorching.
Once cooled, the real magic begins. Sanding and polishing are non-negotiable if you want that coveted marble sheen. Start with a coarse-grit sandpaper (around 400-grit) to smooth out any imperfections, then gradually work your way up to 2000-grit for a flawless finish. For an extra touch of luxury, use a high-gloss varnish or resin. A glossy finish will enhance the clay’s translucency, making your veins appear to glow from within, just like real marble under sunlight.
Don’t overlook the power of light. Place your finished piece near a window or under a lamp to observe how the light interacts with the veins. Adjust your sanding or polishing as needed to highlight the most striking areas. The goal is to create a piece that doesn’t just look like marble—it feels like marble, with a cool, smooth surface that begs to be touched.
Beyond the Basics: Elevating Your Marble Creations
Once you’ve mastered the fundamentals, the world of polymer clay marble becomes your playground. Why stop at flat sheets or simple beads when you can create three-dimensional marvels? Try sculpting a marble-like vase, a set of coasters, or even a life-sized bust with veins that cascade down the neck like a frozen waterfall. The techniques remain the same, but the possibilities expand exponentially.
Another advanced trick is incorporating metallic accents. Thin sheets of gold or silver leaf can be embedded into your clay before baking, adding a touch of opulence reminiscent of gilded marble in historic palaces. Alternatively, experiment with mica powders to create a pearlescent effect, perfect for capturing the iridescent sheen of rare marble varieties like Breccia Oniciata.
For the truly adventurous, consider combining polymer clay with other materials. Embedding crushed glass or mother-of-pearl into your clay before baking can create a millefiori effect, where the inclusions catch the light like scattered diamonds. The contrast between the smooth clay and the rough, reflective materials adds a layer of complexity that elevates your work from “impressive” to “museum-worthy.”
The Mindset Shift: Seeing Clay Through a New Lens
This trick isn’t just about technique—it’s about perception. When you first start working with polymer clay, it’s easy to see it as a humble, almost childish medium, far removed from the hallowed halls of marble sculpture. But that limited view is what holds most artists back. Polymer clay is a chameleon. It can mimic wood, metal, glass, and yes—even stone. The only boundary is your imagination.
Embrace the challenge of pushing your skills further. Study real marble in museums, in architecture, or even in your own home. Notice how the veins twist and turn, how the colors shift in different lighting. The more you observe, the more nuanced your creations will become. Polymer clay marble isn’t about fooling the eye—it’s about capturing the soul of the material, its history, its elegance, and its timelessness.
So, the next time you hold a lump of polymer clay, don’t see it as just another crafting material. See it as a blank canvas, a slab of potential, a gateway to creating something that transcends its humble origins. With the right techniques, a keen eye, and a willingness to experiment, you’ll craft pieces that don’t just look like marble—they *are* marble, in all its glory, reimagined for the modern artisan.
Now, go forth and let your clay sing. The marble illusion awaits.


Leave a Comment