

Imagine a world where your oil paintings never crack, never yellow, and never betray the passage of time. Where each layer you apply is a deliberate step toward a masterpiece, not a gamble with fate. This isn’t alchemy—it’s the fat over lean rule, the unsung hero of oil painting that separates the fleeting dabblers from the timeless maestros. If you’ve ever watched your carefully crafted layers peel away like autumn leaves, or marveled at old paintings where the colors have darkened into oblivion, this rule is your salvation. Buckle up. We’re about to flip your artistic universe upside down.
Picture this: You’re in your studio, brush in hand, staring at a canvas that’s already bristling with layers of paint. Your heart races. You’ve heard whispers about fat over lean, but what does it even mean? Is it some arcane secret passed down by Renaissance monks, or just another hoop to jump through? Spoiler alert: It’s neither. It’s a fundamental principle rooted in chemistry and physics, disguised as a simple rule. And once you grasp it, your paintings will stop being fragile relics and start being indestructible legacies.

The Alchemy of Oil Paint: Why Fat Over Lean Matters
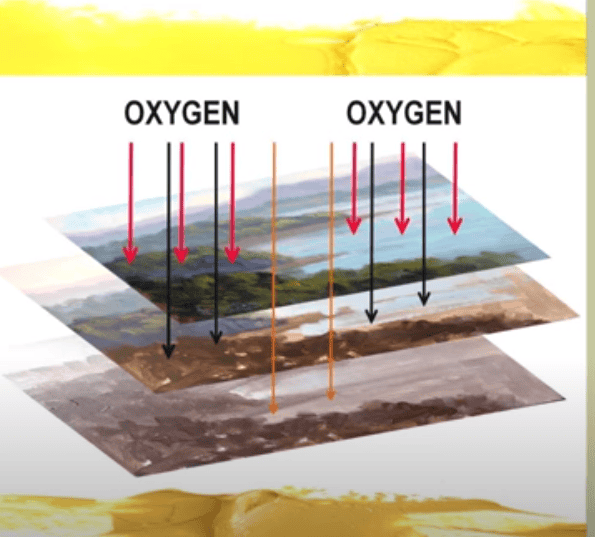
Oil paint isn’t just pigment suspended in oil—it’s a living, breathing entity with its own rules of survival. At its core, the fat over lean rule governs how layers of paint dry and interact over time. “Fat” refers to paint with a higher oil content, while “lean” means paint with less oil, often thinned with solvents like turpentine or odorless mineral spirits. The rule states a simple truth: each subsequent layer of paint should be fatter (more oil-rich) than the one beneath it. Why? Because oil paint dries through oxidation, a process that causes the paint to contract slightly as it hardens. If a lean layer is topped with a fat one, the top layer will dry more slowly and remain flexible longer, preventing cracks as the lower layers contract.
Think of it like building a skyscraper. The foundation must be sturdy, but if you pour a slab of concrete and immediately stack a heavy steel beam on top, the beam will crack under the strain. Instead, you build the foundation, then add lighter materials, gradually increasing the weight as the structure stabilizes. Oil painting works the same way. Start with lean layers—thin washes, quick sketches—and gradually introduce thicker, oil-rich applications. Ignore this, and your painting becomes a ticking time bomb, destined to develop a web of cracks known as craquelure.
Breaking Down the Layers: From Lean to Fat
So, how do you apply this rule without turning your process into a chemistry experiment? Let’s dissect the layers, from the ground up.
Layer 1: The Imprimatura
This is your initial stain—a thin, lean wash of paint, often diluted with solvent, applied to the primed canvas. Its purpose isn’t to create detail but to establish a tonal foundation and kill the stark whiteness of the gesso. Think of it as the primer coat on a wall; it sets the stage without drawing attention to itself. Use a solvent like odorless mineral spirits to thin your paint to a watery consistency. Avoid oils here—they’ll make the layer too fat, disrupting the balance.
Layer 2: The Underpainting
Now, you’re ready to build. Your underpainting is where you block in the composition, establish values, and map out the lights and darks. This layer should still be relatively lean, but not as thin as the imprimatura. Mix your paint with a bit of medium—perhaps a 1:1 ratio of oil to solvent—to maintain some flexibility. Avoid heavy impasto here; think of it as the rough draft of your novel, not the final manuscript.
Layer 3: The Middle Layers
This is where the magic happens. You’re no longer sketching; you’re refining. Your paint should be richer, with more oil and less solvent. A medium like linseed oil or stand oil can be added to increase the fat content. These layers are where you start to introduce texture, subtle blending, and the beginnings of detail. The key is to ensure each layer is slightly fatter than the one before it. If your underpainting was lean, your middle layers should be semi-fat, with a higher oil-to-pigment ratio.
Layer 4: The Final Layers
Here, you’re in full bloom. The fat over lean rule reaches its crescendo. Your final layers should be the richest, most buttery applications of paint you can muster. Use pure oil paint straight from the tube, or mix in glazing mediums to create luminous, transparent veils of color. These layers will dry the slowest, remaining pliable as the lower layers contract. This is where you add the final highlights, the crispest details, and the most vibrant colors. Your painting is now a fortress, impervious to the ravages of time.
The Hidden Dangers: When Fat Over Lean Goes Wrong
It’s easy to dismiss the fat over lean rule as a minor technicality—until your painting betrays you. Cracks aren’t the only consequence of ignoring this principle. Let’s explore the other ways your artwork can suffer when the balance is off.
Yellowing and Darkening
Oil paint yellows over time, especially in the presence of excessive oil. If you’ve ever seen an old masterpiece where the colors have dulled into a sepia haze, you’ve witnessed the aftermath of too much fat in the lower layers. The excess oil oxidizes and darkens, casting a murky veil over your vibrant hues. To combat this, keep your early layers lean and avoid overloading them with oil. Reserve the fattest layers for the final stages, where their slow drying won’t compromise the integrity of the painting.
Delamination
Delamination occurs when layers of paint separate from each other, like pages peeling from a book. This happens when a fat layer is applied over a lean one that hasn’t fully dried. The lean layer dries and contracts, pulling away from the fat layer above it. The result? A painting that looks like it’s been through a shredder. To prevent this, always ensure each layer is dry to the touch before applying the next. Patience is your ally here—rushing is the enemy of longevity.
Surface Tension and Cracking
When a lean layer is topped with a fat one, the fat layer dries more slowly and remains flexible. But if you reverse the order—fat over lean—the top layer dries faster and contracts more quickly, creating surface tension that can lead to cracking. It’s like stretching a rubber band over a rigid frame; eventually, something’s gotta give. The cracks may not appear immediately, but give your painting a few years, and those stress fractures will emerge, marring your hard work.
Myths and Misconceptions: Dispelling the Fog
The fat over lean rule is often shrouded in mystery, with myths and misconceptions clouding its simplicity. Let’s clear the air.
Myth 1: “Fat Over Lean Only Applies to Thick Paintings”
This rule isn’t about thickness—it’s about oil content. Even a thin glaze can be “fat” if it’s high in oil, and a thick impasto can be “lean” if it’s loaded with solvent. The key is the ratio of oil to pigment and solvent, not the physical thickness of the paint.
Myth 2: “You Need Special Mediums to Follow the Rule”
While mediums can help, they’re not mandatory. The rule is about understanding the inherent properties of your materials. A lean layer is simply one with less oil, whether that’s achieved with solvent, a fast-drying medium, or a dry brush technique. Start lean, end fat—it’s that straightforward.
Myth 3: “The Rule is Set in Stone”
Artists bend rules all the time, and the fat over lean rule is no exception. Some contemporary painters intentionally break it for expressive effect, embracing cracking as part of the aesthetic. But understand the rule before you break it. Know the consequences, and then decide if the risk is worth the reward.
The Grand Finale: Your Paintings, Reimagined
You started this journey with a question: Why do some paintings last centuries while others crumble into dust? The answer lies in a simple principle that’s been hiding in plain sight. The fat over lean rule isn’t a constraint—it’s a liberation. It frees you from the fear of time, from the anxiety of cracking, from the slow decay of your artistic legacy. It transforms your process from a gamble into a guarantee.
So, the next time you stand before a blank canvas, remember: start lean, end fat. Build your layers like a master architect, each one a deliberate step toward immortality. Your paintings won’t just survive—they’ll thrive, defying the ages with a resilience that borders on the miraculous.
Now, pick up your brush. The canvas is waiting. And time? Time is on your side.


Leave a Comment